The Ultimate Beginner’s Guide to GCash App
Disclaimer: This post is not a financial or investing advice, it’s for educational purposes only. It may contain affiliate links, meaning I get a commission if you decide to make a purchase, at no extra cost to you. Read our disclosure
GCash is the most popular mobile e-wallet available in the Philippines. This post outlines GCash app basics such as account creation & deletion, app installation, verification, etc.
Although it is powerful and can do a lot for you, its functions can be confusing. There is no comprehensive resource that teaches you how GCash works.
Check out the other parts of the GCash Ultimate Guide series: GCash Cash In, GCash Mastercard, and GCash Cash Out.
This article has the answer. It’s the ultimate guide I created to answer all your questions regarding GCash. Please bookmark this page to save it for later.
You may also want to check the list of participating banks and wallets in QR PH.
What is GCash
GCash can be described as a mobile e-wallet. To put it simply, here’s a comparison.
In a traditional wallet, you will find paper bills and IDs in your leather wallet. To pay for groceries at the supermarket or dinner at a restaurant, you can take cash out of your wallet. You can also use physical cash offline.
The GCash wallet works similarly, but it is “digital”. Although you don’t have any physical cash, you have electronic cash.
GCash can be used to send money, make bank transfers, pay bills, loan money, and order from grocery shops. All transactions can be done online using your mobile phone with an internet connection.
What is GCash Account ID
Your GCash Account ID is your Account Number or your GCash Mobile Number. It is the same thing.
You will use your GCash account number for various transactions such as receiving or sending money, bill payments and many others.
How do you check or view your GCash account number? Follow these 3 simple steps.
Step 1: Log in to the GCash app then tap “Profile”
Step 2: Your GCash Account ID / Account Number is below your name

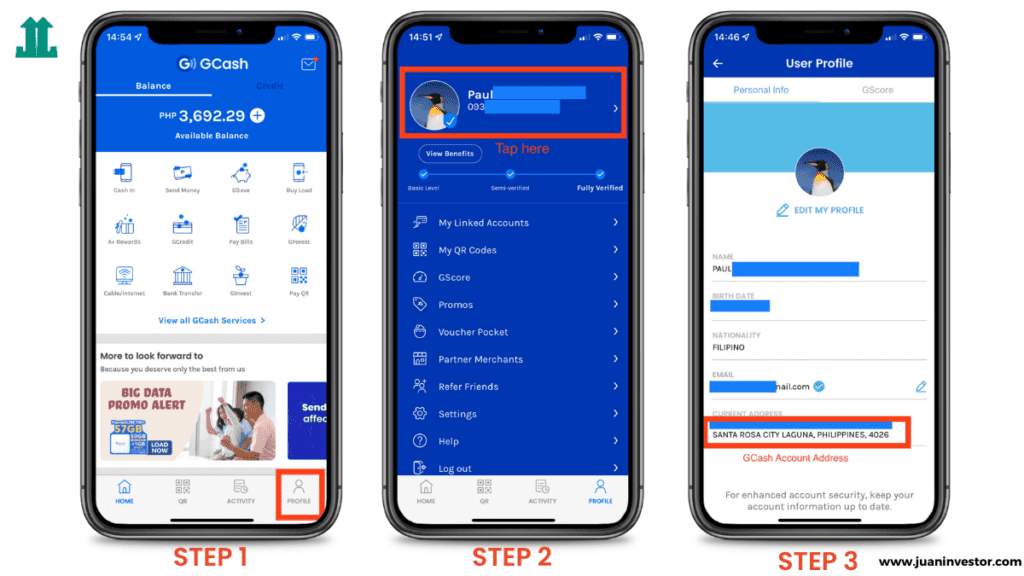
What is the GCash Account Address
Your GCash Account Address is your registered address in GCash. Follow these steps to view or check your GCash account address.
Step 1: Log in to the GCash app then tap “Profile”
Step 2: Tap your name or profile photo
Step 3: Scroll down and now you can see your GCash account address
What is GCash MPIN
MPIN stands for Mobile Personal Identification Number. It’s a 4-digit security code used to authorize logins and transactions. Always remember (or take note) your MPIN.
You should NEVER share your GCash MPIN. Anyone who has your GCash MPIN can access your account and potentially steal your wallet.
Physical Wallet vs Digital Wallet Infographic

How to Create a GCash Account
Registration for GCash is easy. These are the steps to follow.
Step 1. Register to GCash
Note: Click that button above to claim your ₱70 reward once you’re verified
Step 2. Tap “Proceed to GCash Registration”
Step 3. Enter your mobile number and tap “Next”
Note: Make sure this is an active number. You will receive the one-time pin (OTP) thru this number.
Step 4. An authentication code will be sent to your registered mobile number. Copy and paste this code, then tap “Submit Code”
Step 5. Enter your personal information like name, email, date of birth, and address. Tap “Submit”
Step 6. Create your mobile PIN.
Note: Remember your PIN. You will use this PIN for all Gcash transactions.
Step 7. Read the Terms and Conditions and tap “Submit”
Congratulations, you have created a GCash account!
How to Install the GCash App
GCash is available for Android and iOS users. However, you can’t access GCash with a computer.
To download the GCash app, click the buttons below.


How to Update the GCash app
Follow the steps below to update your GCash app.
For Android Users
To update the GCash app on your Android phone, follow these steps.
Step 1: Open the Google Play Store app then tap your profile icon
Step 2: Tap Manage Apps and Device
Step 3: Apps with the available updates are labeled “Update Available”. Search for GCash and tap “Update”
For iPhone Users
If you’re an iPhone user then it’s quite simple to update the GCash app. Follow these 2 steps.
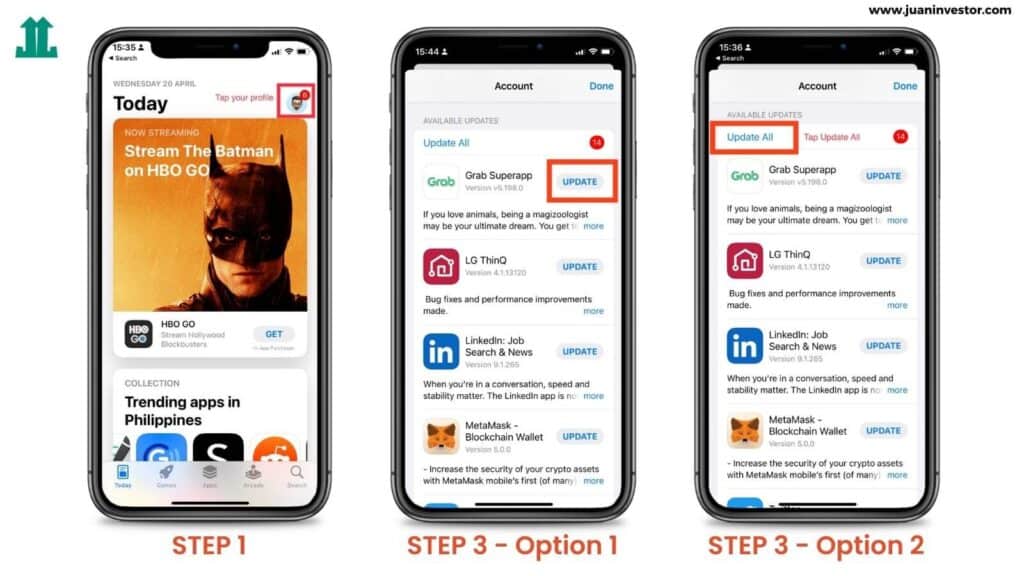
Step 1: Open the App Store, then tap your profile icon
Step 2: Scroll down and drag persistently to refresh available updates.
Step 3: Apps with the available updates are labeled “Update”. Search for GCash and tap “Update” or tap “Update All” to update all apps at once
How to Change Number in GCash
For some reason, you might wanna change your GCash number. Perhaps you lost your phone/sim and you no longer have access to it. If that’s the case, follow these steps to update your GCash number.
Step 1: Submit a ticket through the GCash app or Submit a ticket in the GCash Help Center within 24 hours
Step 2: Fill out the form completely and attach files or documents that could help with your request. For the “Concern” category, choose My Gcash Account > I lost my SIM card/phone
Step 3: Tap “Submit” and take note of the 8-digit reference number. Wait for the response of GCash Customer Support via the GCash app or email.
Step 4: Contact your service provider for a replacement SIM.
- If you receive a new SIM with the same mobile number, submit a ticket to cancel your previous ticket
- If you receive a new SIM with a different mobile number:
- Register for a new GCash account
- Submit a new ticket to request for transfer of your available balance to your new account. For the “Concern” category, choose: My Gcash Account > I still have funds on my old lost SIM, kindly transfer to my new number
- Make sure to list down all GCash services that you’re subscribed to i.e. GInsure, GInvest, GSave, GCredit
- You’ll receive an email confirmation within 48 hours
- After 48 hours, you can proceed with verifying your new number in the GCash app
How to Change Name in GCash
What if after registration you noticed a typo in your name? Worry not, you can change your name by updating your profile.
And not just your name, you can also update any of your personal information such as birth date, nationality, or home address. For a change of email, you can do that directly through the app without verification.
Here’s the step-by-step process.
Step 1: Prepare a government-issued ID. Here’s the list of accepted IDs for account verification.
Step 2: Log in to the GCash app. Tap “Profile” then tap your name
Step 3: Tap “Edit My Profile”
Step 4: Enter the 6-digit authentication code sent to your registered phone
Step 5: Complete the change that you wish to update and tap “Submit”
Your profile will be updated within 72 hours.
How to Check GCash Limit Per Day
If you’re uncertain about your wallet limits or transaction limit per day, you can easily check it through the GCash app. Here’s how you can do that.
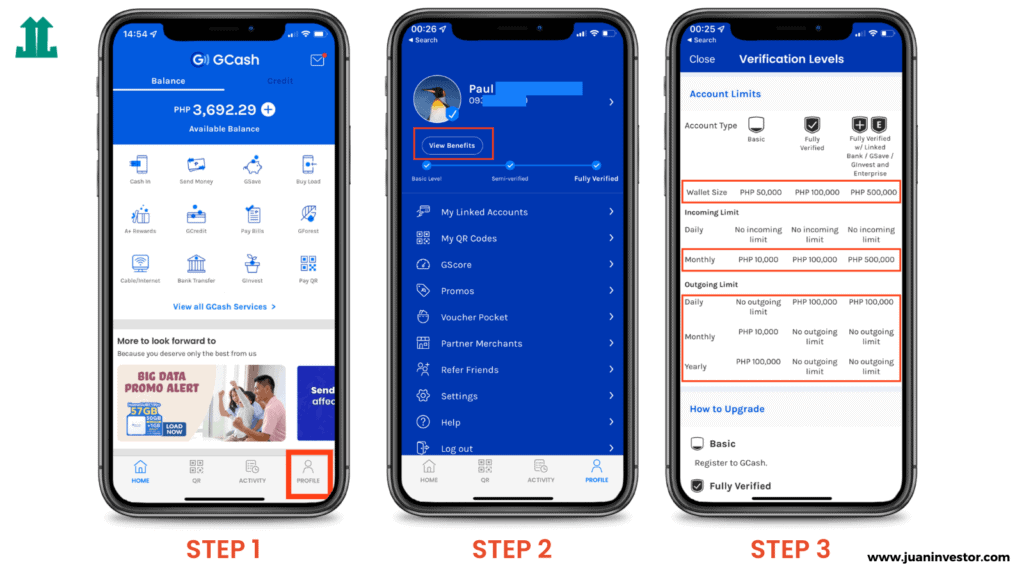
Step 1: Log in to the GCash app then tap “Profile”
Step 2: Below your name, tap “View Benefits”
Step 3: Scroll down to see the Account Limits. There you can see your wallet size, incoming limit, and outgoing limit on a daily and monthly basis.
How to Increase GCash Limit
There are 3 GCash levels: (1) Basic, (2) Fully Verified, or (3) Fully Verified with Linked Bank/GSave/GInvest account. If want to increase your GCash limits, you have to be Fully Verified and link a bank/GSave/GInvest account.
To do that, follow the next section below.
How to Verify GCash Account
Now you have a GCash Account and the app installed. What’s next?
After registering for GCash, you become a Basic account user. You can still access many important features, but it is not recommended. A Fully Verified user is highly recommended.
Basic
- Buy Load
- Offline Cash In
- Pay Bills
- Pay QR Code
Fully-verified
- AMEX Virtual Pay
- Bank Transfer
- Buy Load
- Card Transactions
- Cash Out
- GCash Mastercard
- GCredit
- GInvest
- GSave
- International Remittance
- KKB
- Offline Cash In
- Pay Bills
- Pay QR Code
- Send Money
It is easy to be fully verified. These are some tips to get verified instantly.
Tips for Instant Verification in GCash
Tip 1: Prepare a current Valid ID. GCash will instantly identify you as a legal person by providing a Valid ID – a government-issued identification card.
Recommended IDs
- UMID
- Driver’s License
- Philhealth Card
- SSS ID
- Passport
- Voter’s ID
Other ID
- Alien / Immigrant COR
- Government Office / GOCC ID
- HDMF ID (Pag-ibig)
- Postal ID
Tip 2: Make sure your submitted ID matches the information in GCash. The ID should include your full name, date, and signature, etc.
Tip 3: Make sure that the submitted ID is complete and clear.
- In a well-lit room, take a photo of your entire valid ID
- Take a photo of your original ID. Not the photocopy or soft copy
- Your ID information is easily readable and clear
- Upload your ID correctly. It should be facing up, not upside down.
Tip 4: Take a good selfie
- In a well-lit area, take a selfie
- Ensure that your entire face is well-fitted in the frame
- You should not wear any accessories, such as a headband, face mask, or headband.
- Wear proper attire
Steps To Get Fully Verified in GCash
Step 1: Log in to the Gcash app
Step 2: Tap on the “Profile” icon
Step 3: Tap on “Verify Now” and then “Get Verified”
Step 4: Select from the Valid ID list. Important: Select the correct ID. If you have any of these IDs, your verification will be faster.
Step 5: Take a picture of your Valid ID. It should be clear and legible. Tap on “Submit”
Step 6: Review the guidelines for how to take a photo. Tap on “Next”.
Step 7: Take your selfie. Take a photo of your entire face.
Step 8: Complete the form with your personal data. If you don’t use the correct information, your application will not be accepted for verification. Tap on “Next”
Step 9: Go over the information you have entered
Step 10: Check the box to accept the Terms and Conditions
Once the application is submitted, a confirmation will appear on your screen.
If your application is accepted or denied, you will receive a response within 24 hours.
List of IDs for GCash Account Verification
You have many ID options to verify your GCash account. It depends on your nationality and age.
Filipino Citizens 18 years old and above
These are the preferred IDs you can submit to the GCash app to be verified immediately.
- Driver’s License
- Passport
- Philhealth Card
- Philippine Postal ID
- PRC ID
- SSS ID
- UMID
- Voter’s ID
- Pag-ibig ID
- National ID / Philsys ID
Related post: How to Transfer from Paymaya to GCash
You can also submit these IDs via the GCash Help Center if you do not have the Valid IDs or if you encounter errors.
- Armed Forces of the Philippines (AFP) ID
- Senior Citizen ID
- NBI ID
- PWD ID
- Student ID
- TIN ID. Note: You must submit the following if you’re using a TIN ID:
- Proof of Billing, Statement of Account, or Way Bill
- Secondary IDs such as PSA Birth Certificate, Marriage Contract, Solo Parent ID, Seaman’s Book, POEA Card, Consular ID, DWS Certification, PRA Special Resident Retiree Visa, Firearms License, or PLRA ID
In submitting a ticket, for the “Concern Category”, choose: My GCash Account > I need assistance to get fully verified > I encountered an error during verification > I received an SMS that the ID I submitted was not accepted OR I received an SMS saying additional details have to be cleared out
Filipino Citizens (7 to 17 years old)
A passport is the preferred ID for minors. You will also need to submit your Parent’s Consent stating that the account is being opened as a minor.
You can also submit a Student ID through the GCash Help Center if you don’t possess a Passport. These additional documents will also be required:
- A photocopy of NSO/PSA Birth Certificate
- Name and GCash number of your parent
- A selfie of your parent holding the Student ID
A Foreign National
Foreign nationals should submit the Alien Certificate of Registration (ACR) as an ID. Also, you will need to submit your DOLE Alien Employment or School Registration Form and Proof of Billing.
You can also submit a Foreign Passport through the GCash Help Center if you don’t possess an ACR. Additional documents will also be required:
- Front and back photos of your Passport
- A selfie of you holding your Passport
- Your 3 signatures on paper
How to Verify GCash Without a Valid ID
If you’re a minor (below 18 years old) you can verify GCash using a student ID.
If you’re a person of legal age but without a valid ID, you can use the following IDs:
- Armed Forces of the Philippines (AFP) ID
- Senior Citizen ID
- NBI ID
- PWD ID
- Student ID
- TIN ID
Please refer to the list of IDs for GCash Account Verification for the complete details. There you’ll find other IDs that can be used if you don’t have a Valid ID.
How to Verify GCash Using Student ID
You might be wondering how to get verified if you don’t have a valid ID for minors. It’s possible to get verified with a Student ID. Here’s how to do it.
Step 1: Log in to the GCash app and then tap “Profile”
Step 2: Tap on “Help”, then tap “Submit a Ticket”
Step 3: Complete the entire form. Under “Concern Category,” choose Account Verification > My ID is not on the list
Step 4: Under “ID Submitted for Verification,” select Others. Under “Specify here”, add your Student ID
Step 5: Attach front and back photos of your Student ID, then tap “Submit”
Step 6: Wait for GCash to contact you regarding verification. You may be asked for additional documents, such as parental consent or specimen signatures. You can prepare these documents in advance.
That’s all! Now your GCash Account will be verified within a few days.
How to Delete GCash Account
If you no longer want to use your GCash account and need to delete it, here’s how to do it.
Step 1: Settle your outstanding GCash dues such as GCredit. Your account deletion request will be denied if you still have an outstanding balance.
Step 2: Download and fill out the Account Deletion Request Form completely.
- Enter your Full Name
- GCash Account Number
- Prepare a valid ID such as Passport, Driver’s License, etc.
Step 3: Submit a ticket in the GCash Help Center or through the GCash app.
- Under Concern Category, select My GCash Account > I want to cancel/delete my GCash account
- In the Explain your concern field, enter “I want to delete my GCash account”
- Tick the box of the document that you want to submit for verification.
- In the Attachments field, attach the following documents:
- Accomplished Account Deletion Request
- Photo of your valid ID
- Tap “Submit”
Wait for the GCash representative to respond to your concern within 24 hours.
How to Contact GCash Hotline
If you want to contact GCash for urgent situations or you want to report a GCash account, you can call them through their Customer Care Hotline (2882). You can also submit a ticket through the GCash Help Center.
How to Report GCash Account
A good rule of thumb is to always check the profile of the person you’re sending money. But if for some reason you’ve been scammed by a GCash user, here’s what you can do.
Step 1: Report the incident immediately by calling the GCash Customer Care Hotline (2882). If you can’t contact them through their hotline, you can also submit a ticket to their Help Center.
Or you can also chat with them through their social media channels: Facebook & Instagram. Wait for their response and always check your phone, email, or social media profiles.
Step 2: As much as possible, keep a record of the GCash scammer’s mobile number, name, social media profiles, etc. Supporting documents such as screenshots, conversation history, etc. would help in the investigation.
In the GCash app, you can also trace your previous transactions in the past 30 days. You can do that by logging in to the GCash app then tapping “Activity”, and scroll down to search for a transaction.
How to Request Transaction History in GCash
The GCash app only keeps a record of your transactions in the past 30 days. But what if you want to trace back your previous transactions in the past 6 months or last year?
It’s completely possible and you can do that with the GCash app.
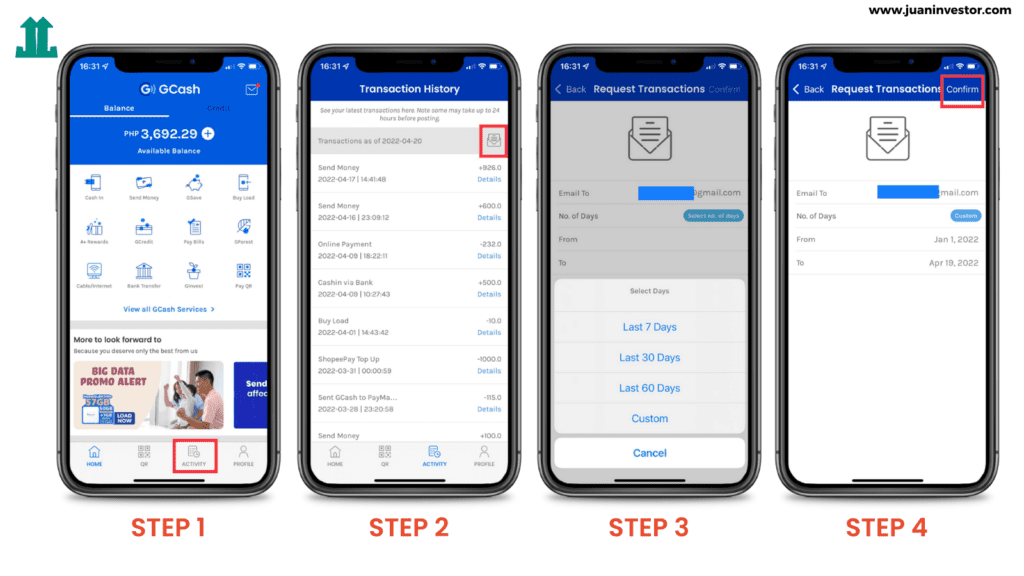
Step 1: Log in to the GCash app then tap “Activity”
Step 2: Tap the Mail icon
Step 3: Enter your email. Under “No. of Days” select “Custom”
Step 4: Choose Start Date and End Date then tap “Confirm”
A confirmation screen appears. Wait for GCash to send your transaction history in your email.
Final Thoughts
GCash has made it easy for anyone to open an account. Fewer barriers mean more entry. In fact, they’re even giving an extra ₱70 for every new user. Again, you can use my GCash referral link to earn ₱70.
Got any questions? Write in the comments sections below.