How to Create a Website in WordPress: Step-by-Step Guide
Learn how to create a WordPress website step by step. From domain setup to design, SEO, and plugins. This ultimate guide makes it easy for beginners.

So, you’re now ready to create a website with WordPress? Great choice! Just in case you missed it, you may want to read our beginner’s guide to WordPress.
WordPress powers over 40% of the internet, which means you’re joining a huge community of creators, bloggers, entrepreneurs, and businesses.
Think of WordPress as your digital canvas. Whether you’re building a blog, an online store, or a portfolio, it gives you the brushes and colors. You just need to start painting.
By the end of this guide, you’ll know how to:
And don’t worry, I’ll walk you through step by step, with plain-English explanations, real examples, and practical tips.
What you’ll need
Before we dive in, here are the essentials:
💡 Pro Tip: If you’re just experimenting, you can also install WordPress locally on your computer using tools like XAMPP or LocalWP. But if you want your site to be public, you’ll need hosting.

Step 1: Choose WordPress.org vs WordPress.com
This is a common confusion point, so let’s clear it up right away.
👉 Recommendation: Go with WordPress.org. It’s more flexible, and most professional sites use it.

Step 2: Pick your domain & hosting
Think of your domain as your home address, and hosting as the land your house sits on. You can’t have one without the other.
For domains, I recommend three providers for best value: Namecheap, Spaceship, and Porkbun. Avoid GoDaddy, it’s quite expensive.
For more details about hosting, check out my recommended hosting for WordPress.
Popular Hosting Providers (Beginner-Friendly)
| Hosting Provider | Why It’s Good | Starter Price (2025) |
|---|---|---|
| More CPU cores and higher RAMs means faster speed (upgradable to 6gb RAM) | ~$2.49/mo | |
 Bluehost Bluehost | Officially recommended by WordPress, simple setup | ~$3.99/mo |
 SiteGround SiteGround | Fast, secure, excellent support | ~$3.99/mo |
| Affordable and beginner-friendly | ~$2.99/mo |
💡 Pro Tip: Always go for hosting that includes a FREE domain and SSL (https://). It makes your site secure and boosts trust.

Step 3: Install WordPress
Most hosting providers now have 1-click WordPress installation. Here’s the general process:
After a minute or two, your WordPress site will be live at:
https://yourdomain.com
Congrats, you’ve officially created your website!

Step 4: Log into your WordPress dashboard
The dashboard is your command center. It’s where you’ll manage posts, pages, themes, and plugins.
You’ll see the WordPress dashboard – a clean sidebar with options like Posts, Pages, Appearance, Plugins, Settings.
Progress Check: At this point, you should have:
If you’ve made it this far, awesome! You’ve completed the foundation.

Step 5: Choose and install a WordPress theme
A theme controls the overall look and layout of your site. WordPress themes saves you time as you don’t need to design from scratch. Here are some of the best WordPress themes to use.
How to install a WordPress theme
💡 Pro Tip: Stick to lightweight, well-coded themes like GeneratePress, Kadence or Astra. They’re fast, customizable, and perfect for beginners.
Step 6: Customize your site’s appearance
Once your theme is active, it’s time to make it your own.
Example: Want your homepage to be a blog? Set it under Homepage Settings > Your Latest Posts. Prefer a landing page? Select A Static Page and choose one.
📌 Remember: Changes here don’t go live until you click Publish.
Step 7: Add essential pages
Your website needs a backbone. Pages give structure and professionalism to your website.
Must-have pages for beginners
👉 How to create a page:
💡 Pro Tip: Don’t overthink copywriting at first. Write simple, clear text. You can refine it later.
Step 8: Create Posts vs Pages
This is a classic beginner confusion. Let’s clear it up:
| Feature | Pages (Static) | Posts (Dynamic) |
|---|---|---|
| Use Case | “About Us,” “Contact” | Blog articles, news updates |
| Date/Time | No timestamp | Timestamped |
| Categories/Tags | No | Yes |
| Appears in Feed | No | Yes |
Think of Pages as the “permanent rooms” in your house, while Posts are the “new blog entries” you add over time.
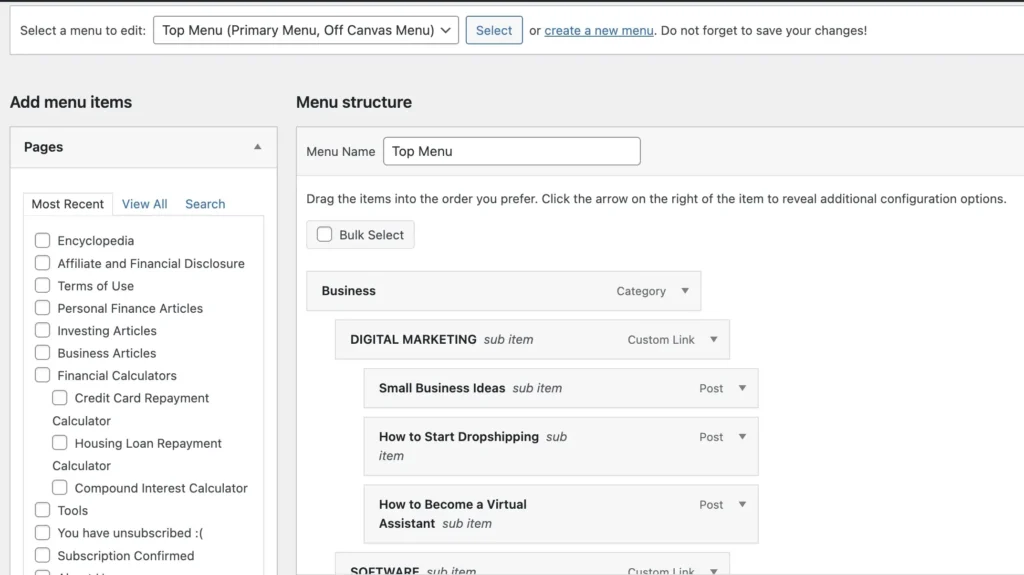
Step 9: Menus & navigation
Visitors need a way to move around your site. And that’s where menus come in. Here’s how to add a navigation menu.
💡 Pro Tip: Keep navigation simple. Aim for 5–7 menu items max. Overcrowded menus confuse visitors.
Step 10: Install essential WordPress plugins
Plugins are like apps for WordPress. They add extra functionality without coding. You may also want to read our article on best WordPress plugins.
Must-have plugins for beginners:
How to install a WordPress plugin:
⚠️ Warning: Don’t install too many plugins. Stick to what you really need. Too many can slow down your site.
Progress Check: By now, you should have:
You now have a functional, presentable website!
Step 11: Fine-tune your site settings
Before going advanced, let’s clean up the basics:
- Set your site title & tagline
- Go to Settings > General
- Example:
- Title: “Juan Investor”
- Tagline: “Smart Money Tips Made Simple”
- Update your permalink structure
- Go to Settings > Permalinks
- Choose Post Name →
https://yourdomain.com/sample-post/ - Why? Clean, keyword-friendly URLs are better for SEO
- Set timezone & language
- Go to Settings > General
- Pick your timezone so post timestamps make sense.
💡 Pro Tip: These little settings help avoid headaches later, like messy URLs or wrong timestamps.
Step 12: Improve site speed
Nobody likes a slow website. Plus, Google ranks faster sites higher.
Quick fixes to improve page speed:
📌 Remember: A fast site = better SEO + happier visitors
* Caching is storing a static version of your site so it loads faster.
Step 13: WordPress SEO essentials
Search Engine Optimization (SEO) makes your site discoverable in Google.
Must-do SEO steps:
- Install an SEO plugin (Rank Math or Yoast).
- Add keywords naturally into:
- Page titles
- Headings (H1, H2, H3)
- Meta descriptions
- Image alt text
- Submit your sitemap to Google Search Console.
- SEO plugins like Rank Math auto-generate this (usually at
yourdomain.com/sitemap_index.xml)
- SEO plugins like Rank Math auto-generate this (usually at
- Install Google Analytics to track traffic.
👉 Why this matters: Without SEO, your site is like a store hidden in a back alley. Nobody knows it’s there. SEO is the signboard on the highway.
Step 14: Add extra features
Once the basics are set, you can enhance your site with extra tools:
Example: If you’re a food blogger, you can install WP Recipe Maker to display recipes beautifully.
💡 Pro Tip: Add features strategically. Each plugin should serve a real purpose. Don’t add “just because it looks cool.”
Step 15: Security & backups
Nothing kills motivation like a hacked site. You must protect yourself early and at all times.
Security checklist:
Backup setup:
👉 Why this matters: If your site crashes or gets hacked, you can restore it in minutes instead of starting from scratch.
💡 Pro Tip: Some hosting providers (like Chemicloud) offer free daily backups so you don’t have to spend on backup plugins.
Step 16: Performance enhancements
Want to go the extra mile? Here are bonus optimization tactics:
- Use a Content Delivery Network (CDN) like Cloudflare to serve your site faster worldwide
- Lazy-load images so they only load when visitors scroll down
- Minify CSS & JS with a plugin (e.g. FlyingPress)
⚡ Result: A site that loads in under 2 seconds = better user experience + higher Google rankings.
Progress Check: Now your site has:
Congratulations! At this stage, your WordPress site is not only live but also ready to grow.
Troubleshooting common WordPress issues
Even with WordPress being user-friendly, hiccups happen. Here’s how to handle them:
1. Error establishing a database connection
- What it means: WordPress can’t talk to your database
- Fix:
- Double-check your database name, username, and password in
wp-config.php. - Ask your host to reset credentials if needed
- Double-check your database name, username, and password in
2. White Screen of Death (WSOD)
- What it means: Your site shows a blank white page.
- Fix:
- Disable plugins one by one (via FTP or hosting control panel) to find the culprit.
- Switch to a default WordPress theme like Twenty Twenty-Five.
3. 404 errors on Pages
- What it means: Pages/posts can’t be found.
- Fix:
- Go to Settings > Permalinks and click Save Changes (this refreshes your URLs).
4. Slow website
- Fix:
- Check caching and image optimization plugins
- Upgrade hosting if traffic is heavy
💡 Pro Tip: Always update WordPress, plugins, and themes. 70% of hacks happen due to outdated software.
WordPress best practices
Here are just a few of the best practices to optimize your WordPress site.
FAQs
Do I need to know coding to use WordPress?
Nope! Most features work with clicks, not code. But knowing basics (HTML/CSS) can help long-term.
How much does a WordPress site cost?
Anywhere from $50–$200/year (domain + hosting + premium themes/plugins). Much cheaper than hiring a developer.
Can I switch WordPress themes later?
Yes, but be careful. Design and layout may shift. Always back up first.
Is WordPress good for e-commerce?
Absolutely! With WooCommerce, you can run a full online store.
What if I mess up my site?
That’s why backups exist. Restore and keep going.
Next steps
Now that your site is up, here’s what you can do next:
Final Thoughts
Congrats, you did it! You’ve gone from zero to WordPress hero:
The best part? You don’t need to be a developer to keep growing. WordPress is like a toolkit. You’ll get better with every project, every post, and every small tweak you make.
Remember: Don’t aim for perfect right away. Aim for progress.
Publish that first post, share your site, and improve as you go. You now have the skills and foundation to run a website like a pro.

